
.
Ionic ngStorage
Ionic ngStorage
1) AngularJS provides a module called ngStorage that helps developer to work with LocalStorage in a better way.
2) We will be using a template source code for this tutorial. Download IonicSideMenu.zip . Unzip the folder and rename it as “IonicSideMenuNgStorage”.
1) Add ngStorage Library to index
Filename: index.html
<!DOCTYPE html>
<html>
<head>
<meta charset="utf-8">
<meta name="viewport" content="initial-scale=1, maximum-scale=1, user-scalable=no, width=device-width">
<title></title>
<script src="lib/ionic/js/ionic.bundle.js"></script>
<script src="https://cdnjs.cloudflare.com/ajax/libs/ngStorage/0.3.6/ngStorage.min.js"></script>
<!-- cordova script (this will be a 404 during development) -->
<script src="cordova.js"></script>
<!-- IF using Sass (run gulp sass first), then uncomment below and remove the CSS includes above
<link href="css/ionic.app.css" rel="stylesheet">
-->
<link href="lib/ionic/css/ionic.css" rel="stylesheet">
<style type="text/css">
.platform-ios .manual-ios-statusbar-padding{
padding-top:20px;
}
.manual-remove-top-padding{
padding-top:0px;
}
.manual-remove-top-padding .scroll{
padding-top:0px !important;
}
ion-list.manual-list-fullwidth div.list, .list.card.manual-card-fullwidth {
margin-left:-10px;
margin-right:-10px;
}
ion-list.manual-list-fullwidth div.list > .item, .list.card.manual-card-fullwidth > .item {
border-radius:0px;
border-left:0px;
border-right: 0px;
}
</style>
<script src="js/app.js"></script>
<script src="js/controllers.js"></script>
<script src="js/routes.js"></script>
<script src="js/directives.js"></script>
<script src="js/services.js"></script>
<!-- Only required for Tab projects w/ pages in multiple tabs
<script src="lib/ionicuirouter/ionicUIRouter.js"></script>
-->
</head>
<body ng-app="app" animation="slide-left-right-ios7">
<div>
<div>
<ion-nav-bar class="bar-stable">
<ion-nav-back-button class="button-icon icon ion-ios-arrow-back">Back</ion-nav-back-button>
</ion-nav-bar>
<ion-nav-view></ion-nav-view>
</div>
</div>
</body>
</html>
|
2) Add ngStorage Module to Ionic
Filename: js/apps.js
// Ionic Starter App
// angular.module is a global place for creating, registering and retrieving Angular modules
// 'starter' is the name of this angular module example (also set in a <body> attribute in index.html)
// the 2nd parameter is an array of 'requires'
// 'starter.services' is found in services.js
// 'starter.controllers' is found in controllers.js
angular.module('app', ['ionic', 'app.controllers', 'app.routes', 'app.directives','app.services','ngStorage'])
.run(function($ionicPlatform) {
$ionicPlatform.ready(function() {
// Hide the accessory bar by default (remove this to show the accessory bar above the keyboard
// for form inputs)
if (window.cordova && window.cordova.plugins && window.cordova.plugins.Keyboard) {
cordova.plugins.Keyboard.hideKeyboardAccessoryBar(true);
cordova.plugins.Keyboard.disableScroll(true);
}
if (window.StatusBar) {
// org.apache.cordova.statusbar required
StatusBar.styleDefault();
}
});
})
|
3) Implement The Module In The Controller
Filename: js/controllers.js
angular.module('app.controllers', [])
.controller('homeCtrl', ['$scope', '$stateParams','$localStorage', // The following is the constructor function for this page's controller. See https://docs.angularjs.org/guide/controller
// You can include any angular dependencies as parameters for this function
// TIP: Access Route Parameters for your page via $stateParams.parameterName
function ($scope, $stateParams,$localStorage) {
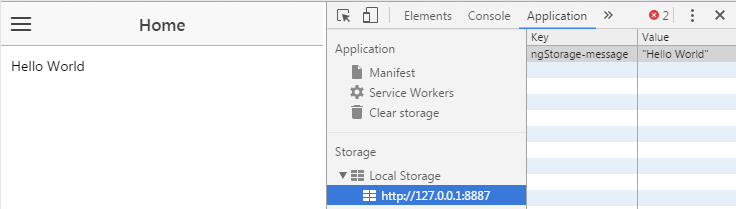
$localStorage.message="Hello World";
$scope.a=$localStorage.message;
}])
.controller('cartCtrl', ['$scope', '$stateParams',// The following is the constructor function for this page's controller. See https://docs.angularjs.org/guide/controller
// You can include any angular dependencies as parameters for this function
// TIP: Access Route Parameters for your page via $stateParams.parameterName
function ($scope, $stateParams) {
}])
.controller('cloudCtrl', ['$scope', '$stateParams', // The following is the constructor function for this page's controller. See https://docs.angularjs.org/guide/controller
// You can include any angular dependencies as parameters for this function
// TIP: Access Route Parameters for your page via $stateParams.parameterName
function ($scope, $stateParams) {
}])
|
4) Insert Ionic Variable Into HTML
Filename: templates/home.html
<ion-view title="Home" id="page1">
<ion-content padding="true" class="has-header">
<p>{{a}}</p>
</ion-content>
</ion-view>
|
No comments:
Post a Comment